How to get started and debug Lambda functions

The best way to learn anything is to play with it on a project and build 👷🏼♀️ something. As I started learning about Lambda functions, I had this list of questions❓that kept coming to mind. To help you better understand Lambda functions, I’ve converted all of my questions, and their answers into a helpful blog post to get you started. Let’s dive in!
What are lambda functions 🤔 and why are they so popular 🌟?
Lambda functions replace the backend API’s 🤯 as you don’t need to have a separate backend repository, but store your lambda functions in the front end itself. They follow the “supply on-demand” model i.e. they will only run when you need them ⏳. Unlike your server, they are not running all the time which means you end up saving a lot of resources, and gives you a performance boost. ✅
You are not maintaining two repositories 🙅🏻♀️ — one for front end 💅 and the other for the backend 👾 but just one which is cool. You would call your functions from your front-end the same way you would call your APIs, i.e. using fetch.
These reasons were enough for me to get started using them on a project. Plus, since Lambda functions are trendy right now, and I was really excited to try them out. 😎
So how do I get started 🍷?
The best way to get started is by searching out some starter documentation online (like this blog post 😉) 🤷🏻♀️. That gave me a bunch of results like this one: https://docs.netlify.com/functions/overview/. This resource really did a good job of explaining what Lambda functions are. I also learned that I could just get started by building a hello world function and deploy it using my Netlify account. This seemed easy. 😊
I created a project using create react app using the following command as I wanted to build my front end with React.
npx create-react-app hello-world
I then installed netlify-cli package 📦 so that I can start creating lambda functions in my project.
👉 Please note, there are two main ways of building your lambda functions — netlify dev and netlify lambda. This doc 🔗 explains when to use what.
- netlify dev: a new way of working with lambda functions.
- netlify-lambda: a shortcut to install function dependencies in production and, (if needed) bundle functions with babel and webpack if you need to (e.g. for writing functions with typescript).
Where can I add my functions code? 🤔
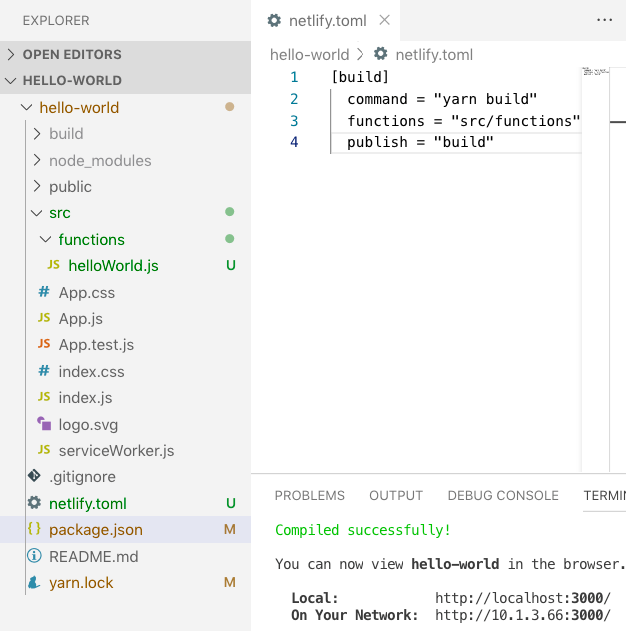
You can declare a path to your functions directory inside netlify.toml, the convention is to call them ‘functions’ but you can call it whatever you want. netlify.toml is where you can tell Netlify to go look 🔎 for your lambda functions. I created a functions directory inside my src and then created a primary hello-world function inside that. I used this post to write a hello world function: https://functions-playground.netlify.com/
exports.handler = (event, context, callback) => {
  callback(null, { statusCode: 200, body: "Hello, World" });
};
My netlify.toml file:
[build]
 command = “yarn build”
 functions = “src/functions”
 publish = “build”
so far so good 🏅
How can I run my functions locally? 👀
Get the netlify cli to test your functions locally. Netlify CLI is a command-line utility that will help you to run and debug your functions. You can just run netlify dev 💯 to see if everything works.
Here is how my project structure looks like:
Here is how you run functions from your browser:

How can I deploy these functions on Netlify along with my 💅 front end?
If you use netlify-dev, you don’t need to use npm-run-all to run your functions and front end in parallel. You need to use netlify dev to start your functions and front-end.
"scripts": {
  "start": "react-scripts start",
  "build": "react-scripts build"
}
Deploy your project to Netlify ♻️
You can use the Netlify CLI to deploy your functions or just push your code to Github and connect your repository to Netlify. Here is a good post on how to do that: https://docs.netlify.com/site-deploys/create-deploys/#deploy-with-git

What if my functions want to use different “node_modules” 📦?
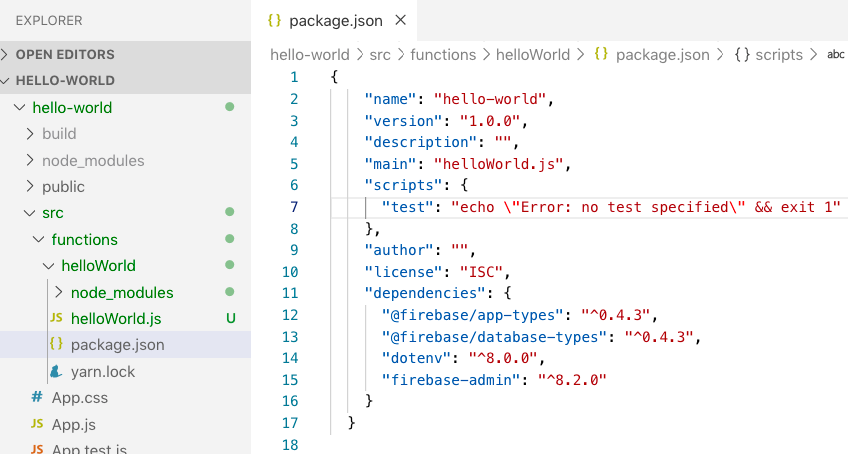
Let’s change the hello world function to use a node module: firebase-admin
To do that, let’s create a hello-world functions directory 📁 which has the hello world function inside it. It lists users collection data from your cloud firestore database. Every function needs to be treated like it’s in an isolated environment, so each directory 📁 will have it’s own node modules 📦, any files 🗂 it needs etc. which means we need a package.json file.
👉 We also need to add a new package.json script called postinstall which will be run by Netlify to install all the node modules for your lambda functions. You do need to use netlify-lambda here to install the node modules for your functions as currently there is no way to do the same with netlify dev.
“postinstall”: “netlify-lambda install”
👉 Please don’t forget to add a .gitignore file in your functions directory as you don’t want to check in all your node modules to Github.
Here is how I structured my functions directory 📁:
Where do I store my secret 🔑 environment information?
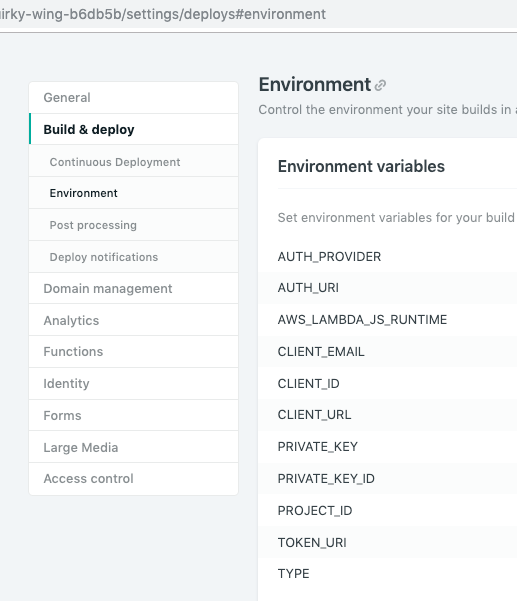
The firebase-admin module requires some config information to run successfully. I’m going to use environment variables to store all the config information. On Netlify, you will store these values like 👈
👉 Please note, you don’t need to add quotes around your “private_key” as you will get unable to read key errors.
Lambda function with firebase-admin
Here is my code that uses firebase-admin module:
const admin = require("firebase-admin");

const config = {
  type: process.env.TYPE,
  project\_id: process.env.PROJECT\_ID,
  private\_key\_id: process.env.PRIVATE\_KEY\_ID,
  private\_key: process.env.PRIVATE\_KEY.replace(/\\n/g, "\n"),
  client\_email: process.env.CLIENT\_EMAIL,
  client\_id: process.env.CLIENT\_ID,
  auth\_uri: process.env.AUTH\_URI,
  token\_uri: process.env.TOKEN\_URI,
  auth\_provider\_x509\_cert\_url: process.env.AUTH\_PROVIDER,
  client\_x509\_cert\_url: process.env.CLIENT\_URL
};

admin.initializeApp({ credential: admin.credential.cert(config) });

const dbInstance = admin.firestore();

const getUsers = () => {
  const userRefs = dbInstance.collection("users");
  return userRefs.get().then(snapshot => {
    return snapshot.docs.map(doc => doc.data());
  });
};

exports.handler = function(event, context, callback) {
  getUsers().then(data => {
      callback(null, {
         statusCode: 400, body: JSON.stringify({ data })
      });
    })
    .catch(err => {
      callback(null, {
        statusCode: 400, body: JSON.stringify({ err: err.message })
      });
    });
};
Which node.js version does Netlify support?
It’s important to ask yourself, which node.js version your package 📦 is compatible with? This is what it says in the docs
By default, Netlify uses Node.js 8.10 as runtime for all new serverless functions written in JavaScript. You can override this by specifying the desired runtime with an environment variable.
For example, to use Node.js 10 for all future serverless functions deployed, set the variable AWS_LAMBDA_JS_RUNTIME with the value nodejs10.x
👉 I had to set AWSLAMBDA_JS_RUNTIME _to nodejs10.x as firebase-admin is compatible with that. 💯 This is very important as your functions might not work if you don’t use the correct node.js version and might return a blank screen. You should always read your logs but this is when you should definitely read the logs for more clues.😄
How to debug Netlify functions 💯?
Netlify CLI 🔗 is very helpful to debug your lambda functions. I like to use netlify deploy which basically deploys the current instance of your lambda functions and gives you a live preview. You can test your functions right away without having to push your code to Github and wait for it to deploy. It also provides you with a link to the logs which you can use for debugging reasons if something works locally but not on Netlify. The turnaround time ⏰is pretty fast.
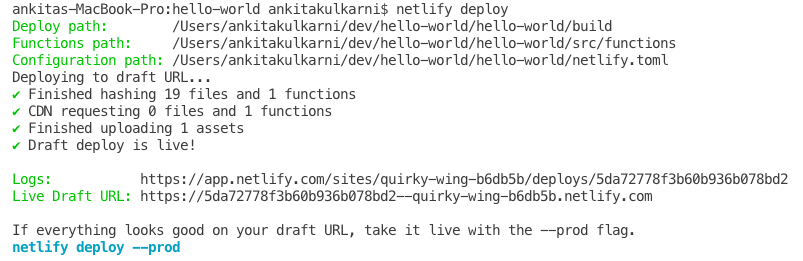
👉 Please note, the logs and the draft URL changes every time you publish a new build using netlify deploy
How to call 🤙 functions from the front-end 💅?
I used fetch to invoke my function and then called getUserService from my front end. Here is how I did it:
export const getUserService = () => {
  return fetch(`/.netlify/functions/helloWorld`).then(response => {
    return response.json();
  });
};
❌ If you invoke your function like localhost: the port where your functions are hosted>, you will get a CORS error as you are trying to call your functions port from your front end port which is different.
I hope this helps and gives you a good overview of how to get started and debug your functions. The code is deployed here if you want to take a look at it: https://github.com/kulkarniankita/hello-world-netlify.
If you have any questions, please post it in the comments below. 🙌